We have discussed a lot more stuff till now on Selenium IDE. I will highly recommend you to go through such articles. Those articles will help you to build up your knowledge base in Selenium from the scratch. We have discussed on all the basics of Selenium IDE, Locating Web elements using various locators and major Selenese to use with Selenium IDE. Now we will learn the operations that we can perform on test cases developed using Selenium IDE.
Whatever we learned till now that was completely theory part, so today we will implement the theories. One point I’d like to mention here if you have just moved from manual testing to Automation testing and you need to understand Selenium. Then you don’t need to worry because this article will teach you everything about writing and executing test cases by using Selenium IDE, along with defect identification.
Test Cases building in Selenium IDE
Selenium IDE allows you to either create a single test case or a collection of test cases. Here the collection of test cases is called as Test suit.
Recording a web page interaction
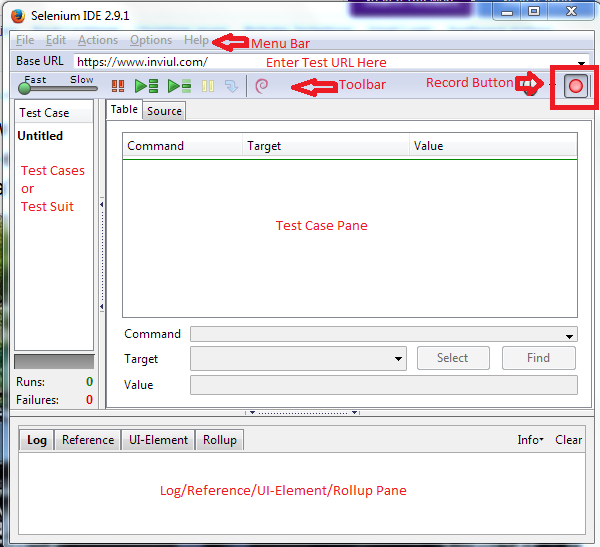
First-time Selenium user starts with recording their web page interaction. We are simply recording our activities on a web page which ultimately comes as a new test case. When you open Selenium IDE first time then you notice the recording button is in ON state by default. So you need to first stop automatic recording mode then need to assure whether URL is correct. Then you can begin recording of the web page interaction.
Selenium IDE gives you the flexibility to turn OFF auto recording mode from “Options” menu.
All your activities and related commands are stored and displayed in “Test Case Pane”. Even a single click on web page gets displayed in this pane. So, simply Selenium turns all your activities into Selenium commands (Selenese) automatically.
Using Context menu to add Assert and Verify
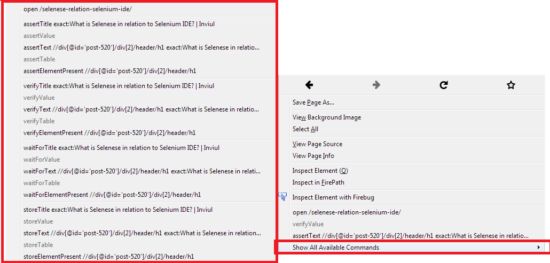
If you are writing test cases then sometimes you need to check the properties of a web page. Therefore, Assert and Verify allows us to check the properties of web elements and the entire web page. The context menu has the list of all Assert and Verify commands.
Just to remind you, we have already discussed most popular Selenium commands in the previous chapter.
Suppose you need to verify a text on web page. Then simply open the page and select that particular test case and perform a right click. You find Context menu then select a verify command, like verifyTextPresent. You can find more suggestions from Context menu by clicking on “Show all available commands”.
One thing you should know that you can check the reference to all your commands at Reference pane.
Editing Test Cases
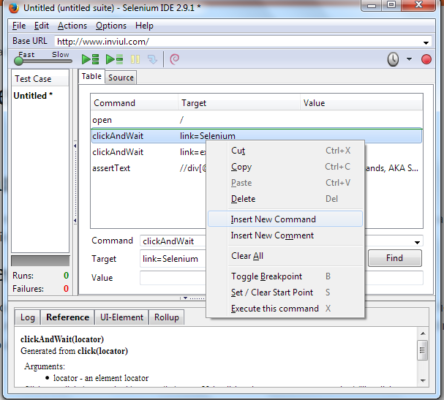
Selenium IDE offers you two choices to edit a test case. First, you can directly insert command in Test case pane table and second, you can insert command at HTML source code. Inserting a command in Table is quite simple.
Perform left-click on the line where you want to insert a new command then perform right-click and select insert command. A blank line will be added where you can insert a new command with its target and value from command editing fields at the bottom.
You can insert a comment like you inserted commands. Comment provides convenience in understanding test cases.
Running Test Cases
Selenium IDE allows running a test case from Toolbar. You can either opt to run all test cases at a time or you can choose to run test cases in step by step ways. It also gives the flexibility to Stop a test case in the middle and Start the test case from middle itself. All these wonders you can do from Toolbar. 🙂
Breakpoints and Startpoints
It is very useful to start or stop test case in the middle, even it helps in debugging. You can set a breakpoint by performing right –click then select Toggle Breakpoint from the Context menu.
Similarly, you can set a Start point from Context menu by selecting Set/Clear start point.
User Extensions
Selenium IDE offers you the flexibility to implement some additional features. User extensions are a JavaScript file which helps you to add some additional features like a loop, statements, etc.
You get access to User Extensions from “Options->General Tab”.


