4 years ago, I started my testing career and I still remember that I first started with Junit. I was really wondered to use Junit as it was making the task easier for me through its annotations. So, I was helping my seniors to develop automation framework with the help of Junit. After a few months, I got to know that developers were also using JUnit for the unit testing of their code. They were using it very efficiently, even better than Automation developers. I felt so because we were still taking help of different API for the implementations of additional features like Reporting, performing data-driven tests, etc. After a year working with Junit, I came across the TestNG framework.
I found quite a lot similarity between TestNG framework and JUnit framework, but there was a difference of a thin line which is making TestNG highly efficient and productive for testers as compared to using JUnit for automation test development.
When we used TestNG in our data-driven framework then some of the problems were easily addressed like Reporting, Data-driven testing, Management of tests in groups, methods, creating test dependencies, etc.
Let’s start our journey to understand this beautiful testing framework- the royal TestNG framework!
Exclusive: Top 200 Selenium Interview Questions
What is TestNG Framework?
TestNG is the framework for testing which is written in Java programming. It is developed by Cedric Beust. He developed this framework after getting inspiration from Junit and Nunit to make the task of testers easier.
TestNG is helpful to give the solution to various testing types at its design level, some of the test categories are listed below:
- Unit testing
- Functional testing
- Integration testing
- System testing
- End to end testing
What are the features of TestNG framework?
Some of the features of TestNG framework are as follows:
- It supports some advanced annotations like @DataProvider and @Factory annotation
- TestNG supports multiple instances
- It is highly efficient for data-driven testing
- TestNG framework is highly flexible, it works efficiently with any build plugins
- A concurrent and parallel run is efficient
- Easy reporting of the test execution
- We can create dependencies of tests, groups, and classes
- It works with default JDK versions
- We can easily implement with TestNG when we have to distribute our tests on nodes
- It facilitates ignoring the tests which are not required
- TestNG helps to set the priority of the test execution
- It has inbuilt test listeners to act on the triggered event
- TestNG facilitates the automatic execution of the failed tests
We will discuss different annotations of the TestNG framework in another tutorial. Let’s see how we can install TestNG framework in Eclipse?
How to install TestNG framework in Eclipse?
Here is step by step procedure to install TestNG framework in Eclipse.
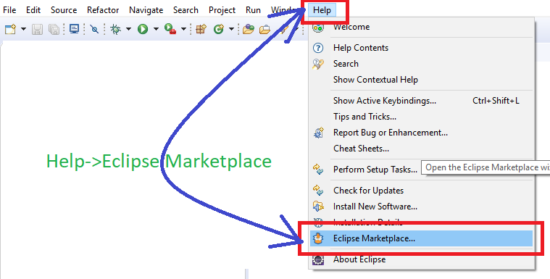
Step# 1: Open Eclipse and Go to Help. Click on Eclipse Marketplace from Help menu.
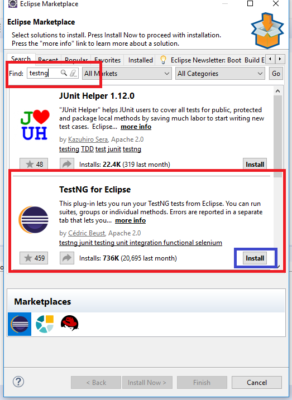
Step# 2: Now you are in Eclipse Marketplace. Type ‘TestNG’ in the Search box and Click Go.
Click on the install button of ‘TestNG for Eclipse’ from the search result.
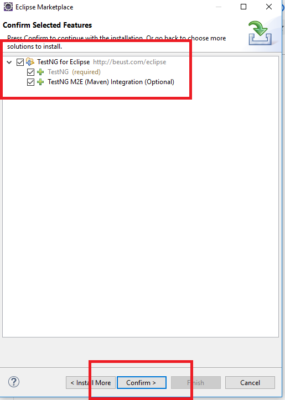
Step# 3: Confirm Selected Feature.
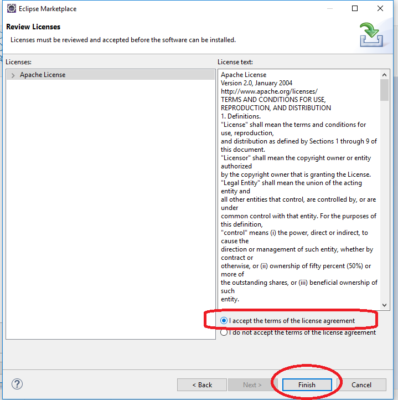
Step# 4: Accept the License terms then click Finish.
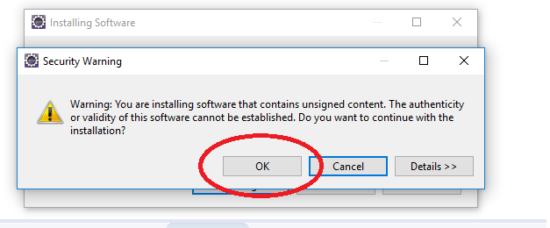
Step# 5: If any security warning appears then click OK.
Step# 6: After successful installation, click yes when the message to restart eclipse prompts.

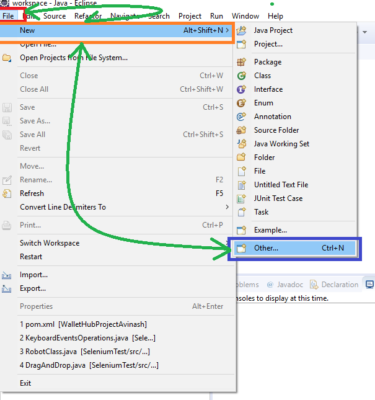
Step# 7: Validate the successful installation of the TestNG framework
Go to File->New->Other
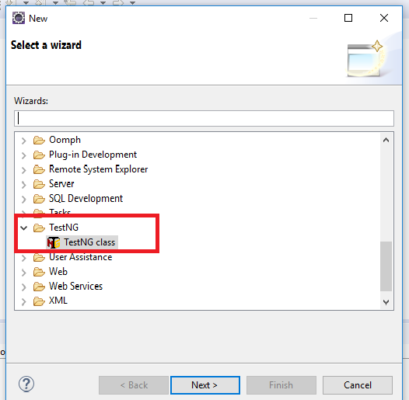
Step# 8: Validate TestNG class appearance
This was all about the installation of the TestNG framework in the project. Stay tuned for more awesome tutorials.


