Our office network generally has a firewall for some categories of websites and we are restricted to open them. Due to their generic definition of firewall which restricts opening websites, sometimes it restricts to open the site where either we need to perform the automation task, or we actually need them for our project assistance. For example, you maintain your project’s repository at Bitbucket and by any chance it is restricted to open, hence you can’t access the repository. Similarly, suppose your code is deployed to some IPs based URL and firewall restricts it to open. So, these are the real-life scenarios which restrict to open websites. In that case, our network team suggests us to set Proxy for them, therefore, we manually open the browser’s LAN setting and we enter the details there. Even we sometimes add specific URLs in Advanced proxy settings.
Our agenda for this tutorial is about the setting proxy at runtime through Selenium WebDriver. This can only be happening through capabilities settings which we have discussed in the last two articles. Here we will use ChromeOptions to set proxy in Chrome browser, similarly, we can use different browser’s option to set proxy in them.
What is the Proxy?
Proxy is the intermediary between your computer and other computers on the web. It acts as the mediator to forward the request to access the contents available at another computer or server.
What are the reasons to use the Proxy server?
There are several reasons for which we use a Proxy server. Some of the reasons are listed as follows:
- It is used to filter the contents on the internet
- Proxy is used for some security reasons
- It is used for parental control
- Proxy have an eye over the kind of data being downloaded and uploaded in the internet
- It blocks personal websites in the office environment
How to manually set Proxy in the computer system?
We can set proxy either manually or through automation at runtime. You must be knowing the manual configuration of the proxy but let me tell you the steps for those who don’t know.
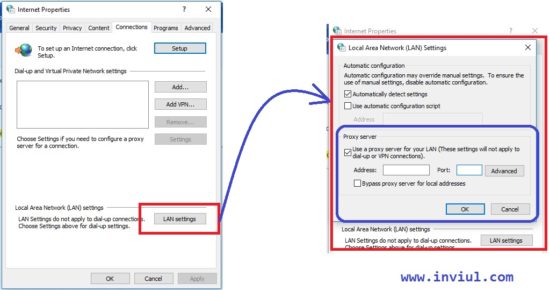
Open your Google Chrome browser then go to setting. Open proxy settings from the setting. You can type in the search box there. Then you see there is an option called LAN Setting, click on it then you get a new window where you find some fields to enter the details of the Proxy server. See image below.

This is how you can set Proxy manually.
If you do not want to change any manual setting, then you can do it at runtime for that session of the browser only through Selenium WebDriver. Let’s have a look over setting proxy through Selenium WebDriver at runtime.
How to set Proxy in Selenium WebDriver at runtime?
We first need to import the Proxy class from the Selenium library. Here it is-
import org.openqa.selenium.Proxy;
Following piece of code used to set proxy in Selenium.
ChromeOptions option = new ChromeOptions();
Proxy proxy = new Proxy();
proxy.setHttpProxy("localhost:5555");
option.setCapability(CapabilityType.PROXY, proxy);
Let’s have a look over the entire program.
package Test;

import java.util.concurrent.TimeUnit;

import org.openqa.selenium.Proxy;
import org.openqa.selenium.WebDriver;
import org.openqa.selenium.chrome.ChromeDriver;
import org.openqa.selenium.chrome.ChromeOptions;
import org.openqa.selenium.remote.CapabilityType;

public class ProxySettingsSelenium {

	public static void main(String[] args) {

		ChromeOptions option = new ChromeOptions();

		Proxy proxy = new Proxy();

		proxy.setHttpProxy("localhost:5555");

		option.setCapability(CapabilityType.PROXY, proxy);

		System.setProperty("webdriver.chrome.driver", "C:\\Selenium\\chromedriver.exe");

		WebDriver  driver  = new ChromeDriver(option);

		 driver.get("https://www.inviul.com/");

	  	  driver.manage().timeouts().implicitlyWait(10, TimeUnit.SECONDS);

	  	  driver.manage().window().maximize();
		}

}
This was all about setting proxy in Selenium. You can share your queries in the comment below.


Hi,
I set the chrome driver proxy to different ip not the local address and run the website icanhazip dot com to know the ip. The website still showing the local IP.