We have already discussed in detail about the configuration of the Selenium Grid with the command line. That previous post is the well-described post which covered all the perspectives of the Selenium Grid. Today we are going to discuss Selenium grid configuration through JSON file. You should be aware of the JSON because it has the vast significance in Selenium WebDriver. Even WebDriver uses wire protocol to send data to the browser.
Before we start Selenium Grid configuration through JSON, I would like to suggest you some awesome tutorials related to parsing of data from JSON. Here we go!
These two articles help you in parameterization through JSON. Additionally, if you want all the basic knowledge of the Selenium Grid then click below link to read more about it.
How to configure hub through JSON file in Selenium Grid?
Selenium already has defined the sample JSON file to configure the hub. We just need to download the sample file, we may make changes, only if required otherwise rest is fine.
Click here to view the Sample JSON file on Github.
Below is the same JSON file:
{
  "port": 4444,
  "newSessionWaitTimeout": -1,
  "servlets" : [],
  "withoutServlets": [],
  "custom": {},
  "capabilityMatcher": "org.openqa.grid.internal.utils.DefaultCapabilityMatcher",
  "registry": "org.openqa.grid.internal.DefaultGridRegistry",
  "throwOnCapabilityNotPresent": true,
  "cleanUpCycle": 5000,
  "role": "hub",
  "debug": false,
  "browserTimeout": 0,
  "timeout": 1800
}
In this JSON file for making hub configuration, we see the definition of port, role, capabilities, etc. I have just copied the data from the hub’s JSON file and stored in the folder with name myhub.json.
Now we need to start the hub through the command line. Type below command in cmd of the folder:
java -jar selenium-server-standalone-3.14.0.jar -role hub -hubConfig myhub.json
Here is the screenshot when the hub is ready.

Tip:
Keep selenium server jar file and json file in the same folder of the hub machine.
You can visit http://localhost:4444/grid/console to identify whether console loaded or not.

How to configure nodes through JSON file in Selenium Grid?
Our next job is to configure and register nodes on the hub through JSON file in Selenium Grid. Again, we need to download the sample JSON file for nodes. Click here to download it.
{
  "capabilities":
  [
    {
      "browserName": "firefox",
      "marionette": true,
      "maxInstances": 5,
      "seleniumProtocol": "WebDriver"
    },
    {
      "browserName": "chrome",
      "maxInstances": 5,
      "seleniumProtocol": "WebDriver"
    },
    {
      "browserName": "internet explorer",
      "platform": "WINDOWS",
      "maxInstances": 1,
      "seleniumProtocol": "WebDriver"
    },
    {
      "browserName": "safari",
      "technologyPreview": false,
      "platform": "MAC",
      "maxInstances": 1,
      "seleniumProtocol": "WebDriver"
    }
  ],
  "proxy": "org.openqa.grid.selenium.proxy.DefaultRemoteProxy",
  "maxSession": 5,
  "port": -1,
  "register": true,
  "registerCycle": 5000,
  "hub": "http://localhost:4444",
  "nodeStatusCheckTimeout": 5000,
  "nodePolling": 5000,
  "role": "node",
  "unregisterIfStillDownAfter": 60000,
  "downPollingLimit": 2,
  "debug": false,
  "servlets" : [],
  "withoutServlets": [],
  "custom": {}
}
Save the above file in the folder. Next, download all the drivers for Chrome, Firefox and Internet Explorer.
Tip:
Keep selenium server jar file and JSON file of the node and all the drivers in the same folder of the node machine.
Once everything is ready then run the below command:
java -Dwebdriver.chrome.driver=”chromedriver.exe” -Dwebdriver.ie.driver=”IEDriverServer.exe”
-Dwebdriver.gecko.driver=”geckodriver.exe” -jar selenium-server-standalone-3.14.0.jar -role node -nodeConfig selfnode.json
Note: This command will be in the same line.
Here is the screenshot of command line when a node is registered.

You should also observe that when a node is registered then the hub screen also displays the message.

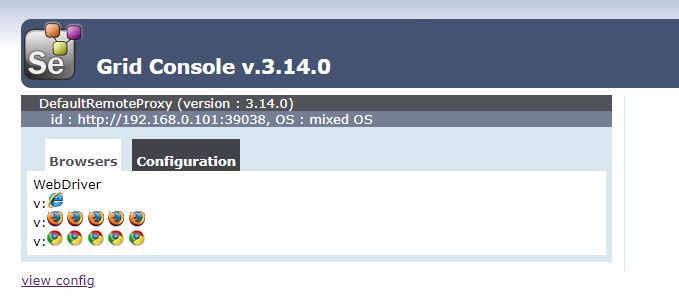
Now verify the node registration by visiting the console page.
http://ipAdressOfNodeMachine:portOfNode/grid/console

Execute test cases on through RemoteWebDriver
Here is the sample program to execute tests on the node.
package com.inviul.selenium.project;

import java.net.MalformedURLException;
import java.net.URL;

import org.openqa.selenium.Platform;
import org.openqa.selenium.WebDriver;
import org.openqa.selenium.chrome.ChromeOptions;
import org.openqa.selenium.remote.DesiredCapabilities;
import org.openqa.selenium.remote.RemoteWebDriver;
import org.testng.annotations.Test;

public class GridImplementation {
  @Test
  public void gridImplementation() throws MalformedURLException {

	  System.setProperty("webdriver.chrome.driver", "C:\\Selenium\\chromedriver.exe");

	  String appUrl = "https://www.inviul.com";
	  String nodeUrl = "http://192.168.0.101:4444/wd/hub";


	  ChromeOptions options = new ChromeOptions();
	  options.addArguments("--start-maximized");
	  options.setCapability(ChromeOptions.CAPABILITY, options);
	  options.setCapability("browserName", "chrome");
	  options.setCapability("acceptSslCerts", "true");
	  options.setCapability("javascriptEnabled", "true");
	  DesiredCapabilities cap = DesiredCapabilities.chrome();
	  options.merge(cap);


	  WebDriver driver = new RemoteWebDriver(new URL(nodeUrl), options);

	  driver.get(appUrl);

	  System.out.println("Title is- "+driver.getTitle());

	  driver.close();
	  driver.quit();
  }
}
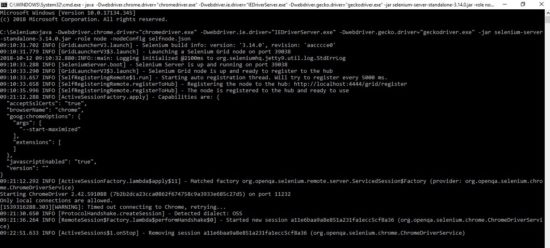
When we run the tests then node and hub machine display the output in the command line.

Hub during execution

Node during execution

