In the previous tutorial, we discussed various aspects of the Cucumber BDD tool like its introduction, significances, and much more. Basically, our last tutorial has the answer to many questions related to Cucumber. In a Nutshell, Cucumber tool has the solution to all the Agile problems. Now agenda of this tutorial is about discussing the installation steps of Cucumber tool in Eclipse IDE to implement Behaviour Driven Testing in your Selenium project.
Before we discuss the installation steps of Cucumber with Eclipse, I would like to suggest you some interesting articles. You can skip them if you already have the knowledge. Here is the list of articles:
- A very effective tutorial on Cryptography
- Do you want to know about Drones?
- Best GPS apps for you
- List of top web browsers
We run cucumber feature file either through command line interface (CLI) or IDE.
Pre-requisites to install Cucumber in Eclipse
Some of the pre-requisites to install Cucumber tool are as follows:
- A system should be configured with JDK
- Required JAR file should be downloaded
Steps to install Cucumber tool with IDE
Let’s discuss important steps to install the cucumber tool in the Eclipse IDE.
Step# 1: Download required JAR files
There are some JAR files which you need to download from Maven Repository for a proper functioning of the Cucumber tool. Those JAR files are listed as below:
- Cucumber-core
- Cobertura code coverage
- Cucumber-java
- Hemcrest core
- Cucumber-html
- Gherkin
- Cucumber-junit
- Junit
- Cucumber-reporting
- TestNG
- Cucumber-jvm-deeps
You need to visit the Maven Repository page and you have to find each jar file through the search box. Click here to navigate to the Maven repository page.
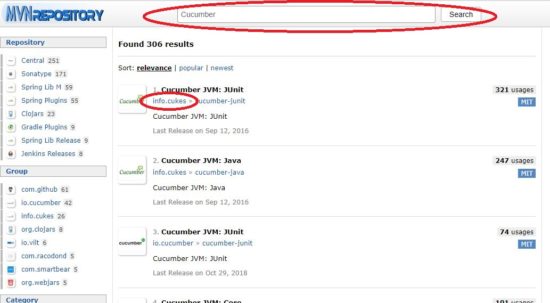
Note: When you download the JAR file, make sure that those JAR files are uploaded by info.cukes and those are having the latest version.
Step# 2: Create a project in Eclipse
Now create a Java project in Eclipse.
Follow the path: File->New->Project->Java Project
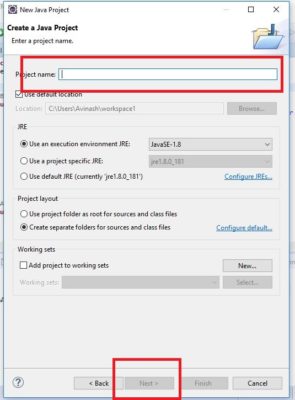
Enter the name of the project then click Next.
Step# 3: Add Cucumber JARs to the project
When you click Next in the previous step then Java Settings window pops up. Click on Libraries here then click on Add External JARs.
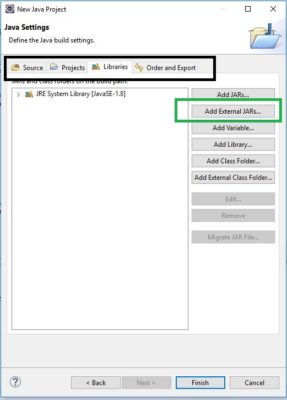
Add all your downloaded Cucumber JAR files then click Finish.
Step# 4: Install Cucumber Eclipse plugin in IDE
You have already created a project having Cucumber JAR files. Now install Cucumber eclipse plugin to create feature files.
Go to Help-> Eclipse Marketplace then type Cucumber Eclipse in the search box then click Go.
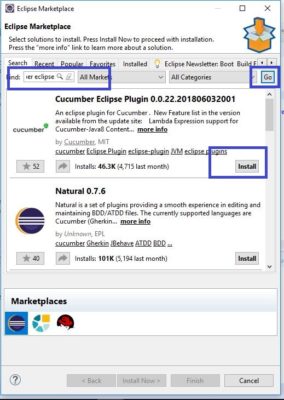
Select Install and follow below screenshots for further installation then click Finish.
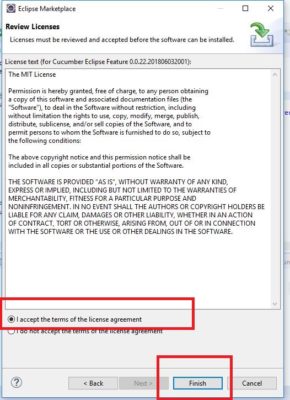
Step# 5: Create Cucumber Feature File
Create a new folder in your project which will carry all your feature file.

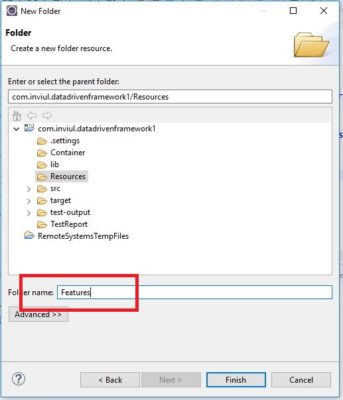
Next, create your first feature file.
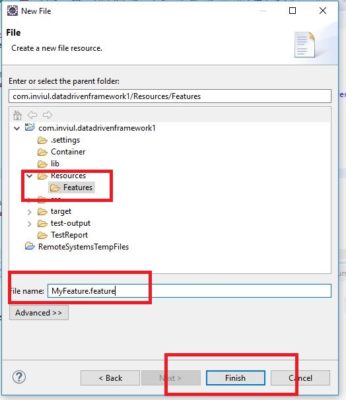
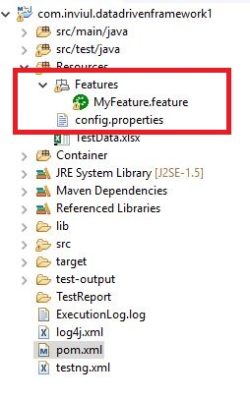
Sample Cucumber Feature File
Below feature file is the first cucumber feature file you get after the first installation.
#Author: your.email@your.domain.com
#Keywords Summary :
#Feature: List of scenarios.
#Scenario: Business rule through the list of steps with arguments.
#Given: Some precondition step
#When: Some key actions
#Then: To observe outcomes or validation
#And, But: To enumerate more Given,When,Then steps
#Scenario Outline: List of steps for data-driven as an Examples and <placeholder>
#Examples: Container for s table
#Background: List of steps run before each of the scenarios
#""" (Doc Strings)
#| (Data Tables)
#@ (Tags/Labels):To group Scenarios
#<> (placeholder)
#""
## (Comments)

#Sample Feature Definition Template

@tag
Feature: Title of your feature
Use this template for the feature file

@tag1
Scenario: Title of your scenario

Given User want to write a step with the precondition
And some other precondition
When User complete action
And some other action
And yet another action
Then User validate the outcomes
And check more outcomes

@tag2
Scenario Outline: Title of your scenario outline

Given User want to write a step with <name>
When User check for the <value> in step
Then User verify the <status> in step

 Examples:

 | name | value | status |

 | name1 | 5 | success |

 | name2 | 7 | Fail |
How to configure Cucumber tool with Maven?
This is the alternative to adding the JAR file to the Selenium project. Instead of adding Cucumber JAR files you just need to create dependencies in the pom.xml file. Here are the dependencies:
<dependencies>
      <dependency>
      <groupId>junit</groupId>
      <artifactId>junit</artifactId>
      <version>4.11</version>
      <scope>test</scope>
  </dependency>
  <dependency>
        <groupId>org.seleniumhq.selenium</groupId>
        <artifactId>selenium-java</artifactId>
        <version>3.13.0</version>
  </dependency>
 <dependency>
        <groupId>org.seleniumhq.selenium</groupId>
        <artifactId>selenium-server</artifactId>
        <version>3.13.0</version>
 </dependency>
 <dependency>
    <groupId>info.cukes</groupId>
    <artifactId>cucumber-core</artifactId>
    <version>1.2.5</version>
  </dependency>
  <dependency>
            <groupId>info.cukes</groupId>
            <artifactId>cucumber-java</artifactId>
            <version>1.2.5</version>
            <scope>test</scope>
   </dependency>
   <dependency>
            <groupId>info.cukes</groupId>
            <artifactId>cucumber-junit</artifactId>
            <version>1.2.5</version>
            <scope>test</scope>
  </dependency>
</dependencies>
This was all about configuration of Cucumber tool with Eclipse IDE. You can ask your doubts by using below comment form.


