Today we will start our first tutorial on Selenium WebDriver. We firstly learn alphabets before making a single word. Similarly, we will learn introductory part of WebDriver that will ultimately help you further in your Automation Testing strategy. A Strong foundation is mandatory to build a multi-storey building. Isn’t it? 🙂
Why Selenium WebDriver for Automation Testing?
If we go back to the history of Selenium then we find the addition of WebDriver API was the primary and new feature to Selenium 2.0. It addressed major limitations of Selenium RC API, Hence, WebDriver offers simpler and concise programming interface.
Selenium WebDriver has the best solution to support dynamic web pages where elements are changing in each moment without entire page reload. It provided a better object oriented approach to automation testing of Web applications.
How does Selenium WebDriver work?
Selenium RC was using JavaScript techniques to inject command into the browser, so, that technique was taking much time. Whereas, Selenium WebDriver uses browser’s native language to send commands. It has inbuilt Drivers like FirefoxDriver, ChromeDriver, etc.
Do we need Selenium Server with WebDriver?
It totally depends on your requirement.
Let me break the ice.
If you are only using WebDriver API and undergoing automation testing in the same machine then you don’t need Selenium Server. Now the question comes- Where does Selenium Server require with Selenium WebDriver?
Let me reveal the beast.
Selenium Server requires in following conditions along with Selenium WebDriver:
- Server & WebDriver are used altogether when you are using Selenium Grid to distribute test cases over multiple machines or Virtual machines
- When you are using HTMLUnitDriver
- When using browser with different version
How to set up Selenium WebDriver project for Automation Testing?
You need Selenium JAR files to make the environment on your system. Once you have JAR files then you need IDE (Integrated Development Environment). Next, you need a build tool, so I recommend Maven.
A separate chapter will be posted here on Maven so keep visiting.
Click here to download Selenium Standalone Server
Click here to download Selenium WebDriver Client for Java
Installation with Java
Installing WebDriver in Java by using Maven is quite easy. Here you don’t need to download JAR files; rather you just need to declare its dependencies in pom.xml. See snippet below from one of the projects:
<?xml version="1.0"?>
<project xsi:schemaLocation="http://maven.apache.org/POM/4.0.0 http://maven.apache.org/xsd/maven-4.0.0.xsd" xmlns="http://maven.apache.org/POM/4.0.0"
    xmlns:xsi="http://www.w3.org/2001/XMLSchema-instance">
  <modelVersion>4.0.0</modelVersion>
  <groupId>com.keywordframework.selenium.BN</groupId>
  <artifactId>FrameworkByAvinash</artifactId>
  <version>0.0.1-SNAPSHOT</version>
  <name>FrameworkByAvinash</name>
  <url>http://maven.apache.org</url>
  <properties>
    <project.build.sourceEncoding>UTF-8</project.build.sourceEncoding>
  </properties>
  <dependencies>
    <dependency>
      <groupId>junit</groupId>
      <artifactId>junit</artifactId>
      <version>3.8.1</version>
      <scope>test</scope>
    </dependency>
    <dependency>
      <groupId>org.testng</groupId>
      <artifactId>testng</artifactId>
      <version>6.10</version>
      <scope>test</scope>
    </dependency>
    <dependency>
      <groupId>org.seleniumhq.selenium</groupId>
      <artifactId>selenium-java</artifactId>
      <version>3.4.0</version>
      <scope>compile</scope>
    </dependency>
    <dependency>
      <groupId>org.seleniumhq.selenium</groupId>
      <artifactId>selenium-server</artifactId>
      <version>3.4.0</version>
      <scope>compile</scope>
    </dependency>
</dependencies>
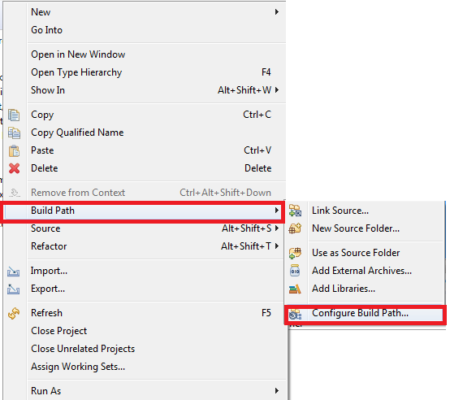
Now for those who don’t want to use Maven then you need to upload JAR Files in Eclipse build path.
Right click on your project->Build Path->Configure Build Path->Add External JAR
In the case of Maven configuration, you should be sure to give the latest version of Selenium server and WebDriver. Now go to command line and open project directory and give below command to run Maven.
mvn clean install
Installation with C#
Microsoft Visual Studio is the best IDE for C# coders. Download latest Selenium dot net zip file. Unzip it and add a reference to each dlls to project in VS.


